 Get Your Scan On
This week the Genealogy Scan Along is all about digitizing — turning a print, negative, or slide into a digital image we can crop, edit, reprint, and share.
If you’re joining us for the first time, the Genealogy Scan Along is a free genealogy project to help you turn a stack of old pictures into a memorable family history photo book. Catch up by visiting:
Join Me for the Genealogy Scan Along Introduction
Genealogy Scan Along Week 1
Anyone can join in, anytime. There’s no registration, no fees, no set requirements. You will need digital images of your photos. The weekly tutorial will cover using an online photo book service to create your book. Ask questions, discuss the project, and share ideas at the Genealogy Scan Along Facebook Group.
Scanner or Smartphone, That is the Question
It’s up to you. My standard guide is to use the best digitizing device available for the task at hand. When I’m at an archives without my portable CanoLide Scanner, I will use my smartphone with a scanning app. At home, I typically use my Epson Perfection V500 flatbed scanner (it’s an old model, but it works just fine). For this Scan Along project I am using my flatbed scanner to digitize my grandfather’s World War I photo albums.
Fragile, damaged, or rare photos and albums should be handled with extreme care, especially when manipulating items on the scanner. Avoid crushing the book and spine with the scanner lid.
See my Toolbox page for scanner reviews and recommendations, and learn more about digitizing with a smartphone camera in my members’ bonus webinar for Legacy FamilyTree “Smartphone-ography for Genealogists.”
I only recommend products I’ve tried and found useful. Affiliate links on this page help support this website, at no additional charge to you. Thank you for your support. Disclosure here.
Week 2: Digitize Your Photos
If you followed the steps in last week’s Scan Along lesson, you have decided on a title, theme and rough sequence for the pictures in your book.
This week, we will digitize the selected images. Remember, when working with photos, wear lint-free gloves or wash your hands and handle photos by the edges. Skip to Next Steps if you have already digitized your selected photos.
You Will Need:
- 30-40 photos selected for your photo book
- Scanner or other digitizing device
- Microfiber cloth or PEC-PAD lint-free pads
Helpful, but not required:
- Archival acid-free box with lid to hold photos between scanning sessions
- Rocket Air Blaster to clean photos
Organize Your Photos
Arrange loose prints in the order you’d like to use them in the book, from first to last. Don’t worry if you are unsure about photo order; you can fine-tune the sequence during the book design phase.
To use pictures in photo albums, digitize each page in the book to minimize future handling. Crop selected individual photos and save as a separate file for your photo book. Some albums have string or post binding that allow pages to be added and removed. Carefully remove album pages and scan pages that fit on the scanner glass. Scan damaged or fragile photos and albums using a camera or smartphone. When working with bound albums, avoid crushing the binding with the weight of the cover. Use your best judgement when working with heirloom books and photos.
 Digitize with a Scanner
1. Wash hands and clean scanner glass. Unplug the power cord. Dust the glass lightly with a lint-free microfiber cloth or PEC-pad. To clean smudges, moisten a fresh cloth with a small amount of glass cleaner and wipe the glass. Do not spray cleaner directly on the glass. Do not use cleaners with acetone, ammonia, benzene, or carbon tetrachloride that might damage the glass. Be careful not to push on the glass or cause scratches. Old photos are often dirty. Clean the scanner glass often using a fresh cloth.
Scanner slow? Reboot your computer. Join the Genealogy Scan Along #familyphotos = #familyhistoryClick To Tweet
TIP: Reboot computer. Scanning is resource intensive.
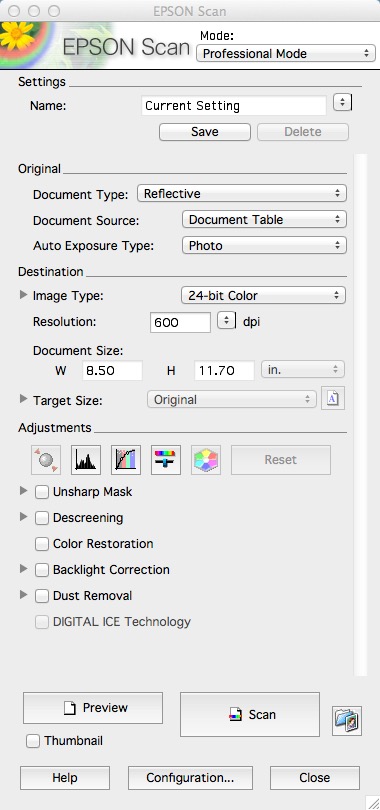
2. Set Format Type: Photographs printed on paper are “reflective.” Film is transparent. Use the appropriate setting for Photos or Film.
3. Set Resolution: Scanner resolution is dots-per-inch. I’ve found 600 dpi for 4 x 6-inch prints will reprint good-quality 8 x 12-inch prints. When scanning tiny prints, I will boost the resolution to 900 or 1200. Use 2400 to 3200 dpi for negatives and slides; allow extra scanning time.
Tip: The Flip-Pal Mobile Scanner offers two options for resolution indicated by one or two stars. Always use the two star option for maximum 600 dpi.
4. Set Color Choice: Select 24-bit color color. I scan everything in full color to capture fading, handwritten notes, and old ink.
5. Set Adjustment Options: Check desired adjustments such as color restoration to correct faded color prints, and add dust removal. Use Digital Ice, if desired, for dust and scratch removal on film.
6. Set File Naming and File-Saving Options: In the Epson software, these options are placed in a second window accessed through the Folder button. For archive quality images, select TIFF file format. Save files to a temporary desktop project folder, for example: Reunion Photo Book. Use batch naming with automatic numbering when available, for example: reunion-book_001.
7. Clean Photos: Before placing a photo on the scanner, I use the Rocket Air Blaster to blow dust from the photo surface. Avoid touching the surface emulsion of the prints. Handle photos by the edges.
8. Preview and Crop Image: Place your photo on the scanner glass face down, close the scanner lid, and create a Preview scan. Crop using the marquee tool. Rotate if needed.
9. Scan Front and Back: Scan both sides of the photo to capture any notes. Batch file naming will give sequential numbers, with odd numbers indicating the front and even numbers indicating the reverse.
10. Clean the Scanner Glass as Needed: Keep the scanner glass clean.
TIP: Label your archival box and box lid “Scanned” and “ToScan” to help you keep track of your progress. Store work in progress inside the box to protect from light and dust.
11. Save a Copy to Your Digital Archive and Backup: The desktop folder is a temporary “project” file folder, not a permanent archive. Save a copy of your scanned images to your regular genealogy photo archive, add meaningful file names, and backup your files. Crop and edit images in the desktop project folder as needed.
Digitize with a Camera or Smartphone
Fragile, damaged, or oversized photos are best digitized with the least amount of handling. Use a camera or smartphone app to minimize awkward handling on the scanner flatbed.
Prepare your Camera
- Megapixels: Maximum
- Flash: Off
- JPG: Maximum quality, no/low compression
- Auto White Balance: On
- Date and Time stamp: Off
- Image Stabilization: On (if available)
Prepare your Smartphone
A scanning app will save time by cropping, de-skewing, adjusting lighting, and adding batch filenames as you scan. Download a scanning app from your device App Store. Some popular apps include: DocScan, Genius Scan, JoyFlips, Qroma, or Turbo Scan. Follow specific instructions for the app.
TIP: For a step-by-step guide to digitizing with a smartphone, see my Legacy FamilyTree Webinar, Smartphone-ography for Genealogists.
Use the Preview option to adjust the image and frame.
Add filename and save images to your phone or the Cloud. Back up images to another storage device.
Set Up Your Camera or Smartphone
For best results, use a tripod with camera or smartphone positioned directly above photographs.
Avoid shutter-shake with a remote shutter release such as a Bluetooth connected release or a wired earbud attachment with volume control or shutter release. Some Android smartphones offer a voice-activated shutter release.
Position your camera in front of a large window to take advantage of natural light. Be careful to avoid shadows.
TIP: For an all-in-one solution, use a copy stand or copy box such as the Shotbox with built-in lighting, background, and camera mount.
What’s Next?
After digitizing your photos, the new scanned files should be located in one desktop folder labeled with the title of your book. This is a working folder, not a permanent archive. Backup this folder by creating a copy on an external drive and another copy on Cloud storage.
To use previously scanned images from your digital library, export image copies to a desktop folder labeled with the title of your book. This will leave the original file untouched in your photo library.
Or, create a Collection inside your photo management software, such as Adobe Lightroom, Adobe Photoshop Elements, or Apple
TIP: If batch file-naming is available in your photo editing software, rename files when you export a copy in the sequence you plan to use the images: photo_01, photo_02, etc.
If you have time after scanning your photos, review the scanned images with your photo software to confirm your selection:
Does it tell the story?
Is it a good photo?
Does it need to be cropped or adjusted?
Edit, fine tune selections, and think about adding other images to fill gaps or add interest to the story. Start making notes about captions or text you will use to tell your photo story.
For a Live Q&A, Discussion, and Tips, join the Genealogy Scan Along Facebook Group.
I only recommend products I’ve tried and found useful. Affiliate links on this page help support this website, at no additional charge to you. Thank you for your support. Disclosure here.
If you like this post, please share!


[…] Genealogy Scan Along Week 2: Scan Your Photos by Denise May Levenick, author of The Family Curator […]