Old family photos are like cars, aren’t they? They need a place to live out of the elements when they aren’t being displayed or driven (your pictures do take you places, don’t they?). Hold that thought.
This morning I spent a few hours with a box of UFO photos I’ve had since the twilight year between the deaths of my mother and my aunt, exactly one year and one day apart. One winter morning after Mom had passed away, her older sister called and said that she had found a box of old family photographs she wanted to give me. It was a bright spot in a very bleak year.
She wanted to split the driving distance and meet in a park where her husband planned to take a hike. Which explains why we sat in the front seat of her car with an old cardboard boot box filled with older family pictures. The box held a motley assortment of black-and-white snapshots, tintypes, and 19th century cabinet cards. Auntie seemed to think most of the photos were from her father’s side of the family, but we only had a short time to look through the contents together and make notes of any people she knew.
I brought the box home and transferred the contents from the boot box to a similar sized archival box. When Auntie passed away a few months later I wished I had pushed for more information about how and where she found the box of photos. It’s been waiting patiently for a little attention until today.
How to Organize Old Family Photos
When I first started working with my family photo collection, I couldn’t decide on the “best” method for organizing the original prints. Should I sort by person? by event? (good for groups), by place? by type of photo? or by some assigned catalog number? I tried different methods and finally came up with a hybrid system that works fairly well. How I sort and organize depends on the project, or the end goal.
My objective for The Boot Box (that’s the official box label) was to sort, identify if possible, prioritize next steps, and move the contents to suitable storage. I am confident that the photos are all from the Brown/Kinsel side of the family, so I’m not worried about creating chaos in my archival closet. I’d like to integrate these loose photos with other sets so that I have a chance of recognizing people or events. My method for unpacking the box is something I came up with several years ago, and it works well for preliminary sorting and organizing. I call it “The Parking Lot Method.”
Step-by-Step Guide to Organizing Old Photos
Professional archivists know the importance of respecting original order within a collection. Collectors (such as your ancestor) often have good reasons for assembling certain photos together on an album page or placeing several snapshots in an envelope. Groupings can indicate families, events, or places. Physical similarities such as the border style on snapshots can indicate photos that were printed from the same roll of film. Maintain original order whenever possible, and look for clues to any items that appear to be grouped together.
Work with one box at a time. I spent about two hours sorting through photos in The Boot Box, making preliminary identifications, inventorying the contents, and placing items in new storage. The Jane and John Does I call UFOs.
The Family Curator’s Parking Lot Method:
1. Wash hands.
2. Unroll a large sheet of white butcher paper on the dining room table. I like paper better than a cotton sheet because the photos don’t get caught on the fabric and I like to jot notes on the paper. The table is the “parking lot.”
3. Unpack the box in layers, keeping any groups together. The contents of The Boot Box had been shuffled so many times that there wasn’t much order except the little stacks made by Auntie the day we looked at the photos together. Remove any staples, paper clips, rubber bands or other foreign objects that often rust or decay and damage photos. Keep the items together with a plastic paper clip or plain sheet of acid-free paper folded in half as a containing folder.
4. Survey the contents. It takes a little time to really look at what you have, to really notice the families and events that are pictured. When you feel like the faces begin to look familiar, start sorting.
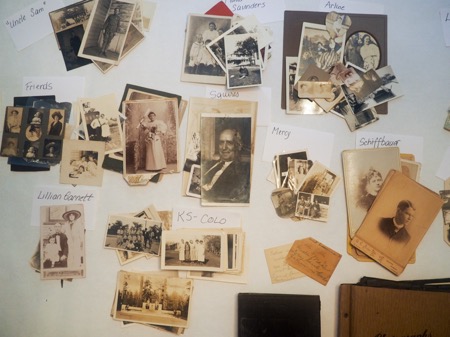
5. Label 3×5 cards with names, places, or whatever makes sense. These will be the “parking spaces.” Group photos together with the “parking” label. I recognized some family groups and found captions or notes that helped identify several more. At the end of my session, I had several groups of photographs and other items:
- 1 group UFO Friends & Family 1940-50
- 1 group UFO Friends & Family pre 1920
- 1 group UFO Colorado and Kansas
- 1 group UFO Children
- 1 group large photos
- 1 old photo album falling apart
- 2 small albums
- several postcards, most blank
- misc. ephemera: unused address book, calendar, Christmas card, etc.
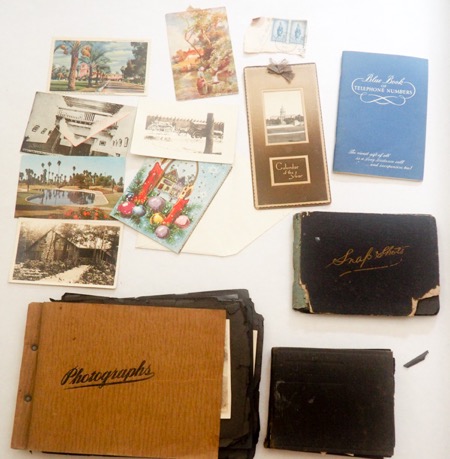
6. Finally, locate any albums or other identified photos. I brought my grandmother’s photo album to the table and reviewed it for captions and notes. This helped identify several more people and places.
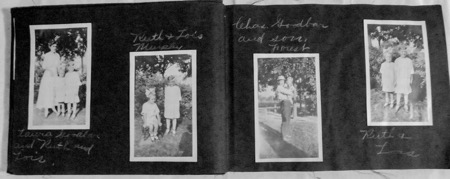
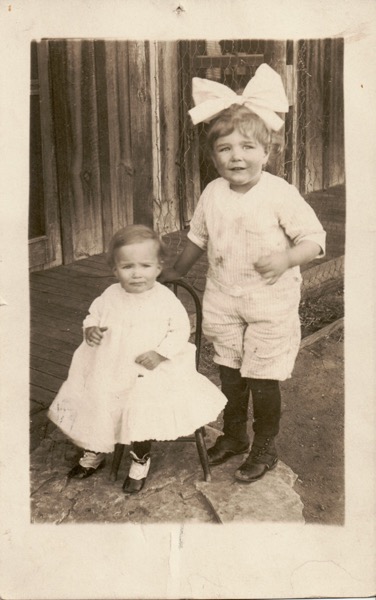
The note on the reverse side of this Real Photo Post Card identified the children as “Lois” and “Ruth” and the writer as “Lora,” and showed a postmark date of 4 April 1912. The photo album page shows photos captioned with “Ruth & Lois Murphy” next to a picture of “Laura Goodbar and Ruth and Lois.” Great clues!
7. Continue identifying photos and grouping prints as much as possible. Some photos in my box looked like extras from an album that was falling apart. Most didn’t have captions, but I grouped them together because they all came from the same album. Other UFO photos were grouped by type of photo or place — several were obviously from a farm, others from family travel.
8. Place each group of photos in an acid-free photo storage envelope or archival folder labeled with the name and notes about any interesting photos or genealogy information you want to pursue. Add a folder number for cross-reference on your inventory sheet.
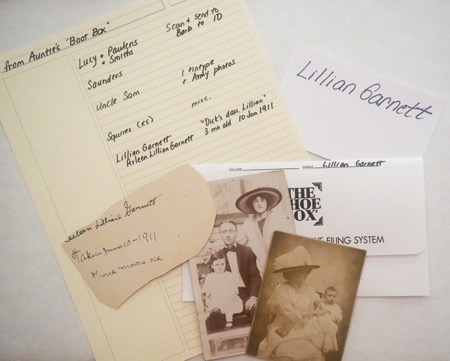
Photos grouped by person and listed on the inventory sheet with notes for Next Steps.
9. List each envelope or folder on an inventory sheet with the your notes and next steps. I marked damaged photos for priority scanning, and others for sharing with a cousin who might be able to help identify the subjects.
10. Re-house the contents of the original box in a new acid-free archival box. You may want to keep all the items together in one box to duplicate the original or store items in other files, depending on the organization of your family archive. I moved the contents of the old cardboard Boot Box to 12 archival photo envelopes (for snapshots), 4 file folders (for the large photos), and one book box (for the album) housed in my family archive. The inventory sheet was placed in my family archive genealogy reference files.
Professional archivists might call this “processing” a collection, but it doesn’t have to be complicated or overwhelming. One box at a time, step by step, the “parking lot” method has helped me organize hundreds of family photos and learn more about the people and events that were important to my family. It can be overwhelming to know where to begin organizing a family photo collection, but a simple method focusing on one box at a time can help you move forward in organizing your family photo archive.
For help with scanning resolution, naming files, and organizing your digital image library, see Part One in How to Archive Family Photos: A Step-by-Step Guide to Organize and Share Your Photos Digitally available from Family Tree Books and Amazon.com.
Disclosure: Thank you for supporting The Family Curator by using the affiliate links on this webiste. There’s no extra cost to you, and your purchase helps keep this resource online. Please read my full Disclosure Policy for more information.





Amy
Always keep your negs.their may come a time were you know a photo of a serten person exset and you can't find it. Or like my wife dose gives too many of them away. you can buy a neg slide sorter light. You lay them on it and you can find the photo it matches Keep the group of neg in the same neg holder that way you might know what year it was taken and write the year down off of the prosseing envelope or even were it was taken that way.. from when you had them prosesed that will get it perty close to the time line it was taken. and you might even rember were it was taken by the group it was in the envelope. depending on how many you have, you can buy neg plastic pages in bulk rather than buying them in lots of 25.
Allso neg are the best reperducktion of a hard copies. be sure you buy a dust cleaner that gets all the dust and smuges off the neg. I have a scanner that scans negitives it is a Epson V370 it cost around $150.00 at worst.
Another thing you are going to have to learn is to size your photos before they make the hard copie. otherwise you will be disapointed in what thay look like. All dig. printing places from what I have asked, can not tell what the size the dig image you give them to make a hard copie. so what happens its centerd and croped you don't get your hole image. There isn't a person their eather most of the time the machine pickes the center of the photo and cropes it at its will. And you don't get the hole photo. I have sent letter to one of the companys and got a reply. that people doing photo reperduction can't make it worth wile to make ever printer to know what size it will print it would cost them to much money. we should make compaine to all companys that do printing of hard copies we want the hole photo not just part of it. from what I understand even your dig camara gets croped. because their are so many differant photo sizes in different camaras. I think its not just folks that lose its everyone.
Hello Amy! As for negatives… I move them out of old paper envelopes to archival negative sleeves. I purchased these in a package of 25 or so at a local camera store. They are archival quality and fit in a 3-ring binder for storage. It's easy to make notes in the label space and keep an index to the negatives this way.
Good luck, Denise
Hello Ed! Your work sounds FABULOUS. Your future descendants will be very grateful for all the time and effort (as well as money) you have invested in preserving your family history. Your identification system sounds like a good one, and because it's pretty simple, it will be easy for others to understand what you are doing. Keep at it, you are an inspiration to the rest of us struggling with our "little" photo collections.
Thank you for taking time to write, Denise
What do you do with the negatives? I have negatives scattered all over the place, separated from the photos!
Thanks.
Hi
I read your artical, it's very informetive. perhappys the are others like me that started doing family history in 1976 and also thought I would never get any of the org photos. So I had a very good 35mm camra and started takeing photos of photos.But over the years I made alot of copies.Like alot of people I had to go to work ,children and many other things to do. so they went in dresser draws and any were I could put them.I was very lucky thow I pushed my parents to write the names on the back of the org.They did it till thay couldn't do it any more. I ended up with alot of the org. photos. I was worried that if the house burnt down the photos would be gone. I started scaning photos 5 years ago and talking my seblings and cousins to by a 2TB hard drive and when I come to visit I up date them. I id the photo on the even number and the od number is who is in the photo on the back of the photo. so what I do is scan the photo and flip it over and scan the back and put the img numbers on the back to Id the photo and who is in the photo. then put it in a arcive album,and d ring album.say you didn't know who was in the photo you can do it two different ways. one is scand both sides with with the id numbers on th back or put the photo number as the id side put a space and a number(2) It will automaticly go behind the photo as a defalt. it may ask you if you want to make it like 25000 (2) click yes it goes right were it belongs.I have been scanning my photos for five years and expect it will take me another 5 years before I am done. by the way I do it 8hr aday 5 days aweek. I am at 23,000 imgs also I buy arcive pages and arcive albums in bulk $175.00 for 500 pages regarless of the size of the photos, and $25 per album and $25 for the cover that slips over it. Just rember you won't get by cheep. just rember you get what you pay for. I would emagen you are asking how much money I have invested in photos and arcive sleeves and albums.and hard copies that I don't have the org photo. I am taking a wild stab in the dark 23,000 photos about $4500.00 but its worth it to me. I am hopeing that whom ever gets my collaction will take care of it as I have! or if it gets split up.I know I have been ask are you really that decated to Family history and photos. I told them yes, but I have a bigger incentive! I have Demica in the early stages. the doctor ask what hobbies I have, I said the only one is family history, he said thats a good one to will help work you mind and you need to exersize allso at the Y He told me, your not going to win but maybe you can slow it down! Hope fully you can read this as my spelling abiltys have gone down and this program doesn't have a spell chech. You are proble wonderin how I spell names. I have family tree makeer and spell check and if some times I can't reconise the word the computer pronounces the word. thank goodness for tecnoliaqge.
Hi Ellie – I'm glad you like my simple system. It seems a little corny to call it a "parking lot," but I've found it really helps to just work in small batches and label as you go. Good luck with your projects.
Jana – Thank you for including this post in your Friday Fab Find. It's an honor to be listed! ~ Denise
I absolutely LOVE this post. To me one of the hardest things about family history isn't the searching or logging but the strategy for effectively processing materials. I also like that your system makes sense for anyone and is repeatable and not overly complicated. You figured something out for me! Thank you.
Denise,
I want to let you know that your blog post is listed in today's Fab Finds post at http://janasgenealogyandfamilyhistory.blogspot.com/2015/07/follow-friday-fab-finds-for-july-10-2015.html
Have a great weekend!
Come back and let us know about your progress, Greta. Good luck.
I'm going to try that system! Just getting around to my mother's large collection of photos and really need help….