Digitize and Preserve Family Photos and Documents
Are you getting the best possible results when you digitize family photos and documents? Check your scanning savvy with these 5 Tips for Scanning Success.
1. Clean the Scanner Glass
Yep, sounds pretty basic but it’s easy to forget. Old photos and documents are often dirty and may even lose bits of paper when handled. Use a microfiber cloth (used for eyeglasses or computer screens) to clean smudges and dirt from the glass of your flat bed scanner. For tough jobs, lightly wet the cloth – not the glass – then wipe the glass firmly with the damp cloth.
2. Use the Right Equipment For the Job
Equipment does make a difference in the end result. Your keepsake originals should only be digitized with a flat-bed scanner or digital camera. DO NOT run heirlooms through a sheet-fed scanner where they could be mangled and torn. Wand scanners are fine for books and pristine documents, but less direct handling is safer for old paper.
Oversize documents can be difficult to manipulate for on an 11 x 14-inch flat bed scanner; minimize the potential for damage by using a digital camera mounted on a copy stand or tripod.
3. Set Up A “Scan Station”
Make use of every minute by keeping your equipment ready to go. If you have space, set up a Scan Station near your computer on a file cabinet or table. Keep your scanner connected to your computer with an external hard drive ready for file storage. Use two trays or boxes to organize your work: To Be Scanned, Scanned. Don’t file away the originals until you have added filenames and tags in your photo organizing software.
4. Break Your Work Into Scanning Sessions
Save time and be more efficient by breaking your scanning into two work sessions: In session one, complete the actual scans; in session two, finish the computer work: add file names; write metadata — captions from the back of photos, tags with people, places, events, copyright info; and place originals in archival storage.
And My All-Time Favorite #1 Secret to Scanning Success
5. Use Professional Mode
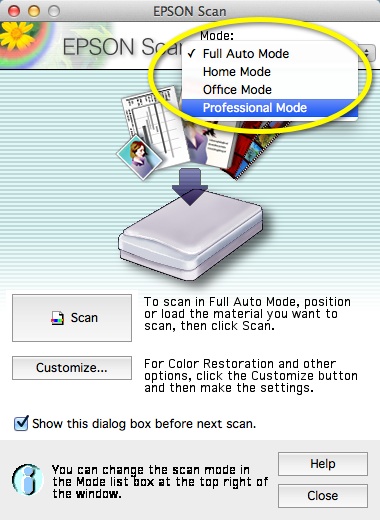
Most scanners come pre-configured for easy scanning. You don’t have to do anything after hitting the Scan button. But if you want access to some of the best features of your flat-bed scanner, you’ll need to unlock the Professional Menu. Look around on your scanner for a drop-down with more options, or check out the manual. You may have Auto, Home, and Professional modes (on Epson), or some other configuration.
When you get to the Pro Menu, you will be able to set the best resolution for your project, choose mode, target size, and unlock color correction and descreening features. If you aren’t sure what all those options can do, refer to the manual or the handy Scanning Guide in my book, How to Archive Family Keepsakes (chapter 9).
For most purposes, you only need to adjust resolution (or DPI) and select Photo or Document. If you wish, you can check Color Restoration to automatically restore faded 1970’s color prints, or Descreening to get better images of newspaper articles.
Find more ideas for organizing and digitizing family treasures and genealogy research in How to Archive Family Keepsakes: Learn How to Preserve Family Photos, Memorabilia & Genealogy Records by Denise May Levenick (Family Tree Books, 2012). Celebrate Preservation Week April 23-May 3, 2014.
Visit TheFamilyCurator.com for more preservation ideas and information.


Hi Lisa – Take a deep breath. . . you have a big project, but it's a Wonderful Big Project. And you are doing exactly the right thing to scan and preserve what ever you can beg, borrow, or (we won't say "steal"). The Flip-Pal is easy and fun to use, but you're right that larger documents might be more easily handled with different equipment. This is a great idea for a blog post, or two or three. But, for now, I suggest you look at purchasing a flatbed scanner. They are really the all-purpose work horse of a digitizing project. My favorite Epson model is listed as a recommendation on my "Store" – link at top right of the page. I like it because the included software gives you everything you need for all kinds of projects.
I hope this gives you some ideas and helps you get started. Thank you for the idea for a future article. ~ Denise
This is about to sound very needy, and I apologize in advance. However, my mother and I have been selected to essentially document my grandparents' "treasures" before they get distributed amongst their nine children. We don't have to rush about it, but I'd like to be efficient and careful. I own a FlipPal, and have used it for scanning my grandmother's 500+ recipe cards. (I have aspirations of dropping them all into a photo book, with a few more notes and photos, for my aunts, uncles, siblings, cousins, but I'm having trouble finding a layout that I like. That's not the problem.) I can tell, though, that I won't enjoy using it for bigger documents. My grandfather was nearly 100, and a photographer from his time in the CCC camps going forward, my grandmother wrote children's books (which she typed, hand illustrated, and hand bound — that's where I started trying to scan with my FlipPal this morning) and they both had family correspondence going way back. I need help — I don't know how to choose a copy stand, a remote (for my camera? for my iPhone?), a regular scanner, a camera that would accept the remote (I have a point and shoot), software, etc. If you had a one-stop shopping list, I would likely take a big swallow, share it with my mother and husband and announce that this will take care of Christmas and birthdays for a while. Otherwise, I'm just paralyzed. (P.S. I wish I had sorted the recipe cards before I scanned, but I had borrowed them from a family member who was proud of keeping them in the same order.) And, if there is a one-stop list on your blog, I apologize in advance for having missed it. Thank you so much, Lisa
Muito bom !
Hi Denise – I have the Canon CanoScan Lide too! I use it for library research trips. I was very frustrated with the included software — I found the documentation difficult to use. I finally realized that the scanner comes with TWO software programs: the default is the Canon Solution Menu EX: Use Scanner or Auto Scan or Start Application. All these choices give you the basic default scan settings.
To get to the "Pro" mode, you have to open this Solution Menu EX and then click on "Start Application" (fourth choice down) to open the MP Navigator EX. This menu is preset and requires a lot of individual selections in order to change the settings.
I found that I was able to change the settings, but it just required too much fiddling. I purchased a third-party scanning program that is easy and works on many different scanners — Hamrick Vue Scan. Well worth the money in my opinion because I can use it with my Epson Perfection Scanner, my HP All-in-One, and the CanoScan. I believe they offer a trial version so you can test it to see if you like it. <http://www.hamrick.com>.
I'm sorry not to have better news about the CanScan software. If you only scan occasionally, or mostly work with the same kind of item you may not mind the bother of adjusting settings through the included software. Good luck. ~ Denise
Thanks for the tips and especially your #1 top tip. I have a Canon CanoScan LiDE 210. I'm still looking for "Pro" settings. In the meantime, how does this scanner rate with the Epson you're using or other scanners?
You're welcome, Fran! I like any shortcuts that make it easier to get a project done!
Thanks for the hints about scanning documents. In particular I like the one about setting up the scanning station. A great idea. This will make it much easier to get on with lots of scanning jobs.