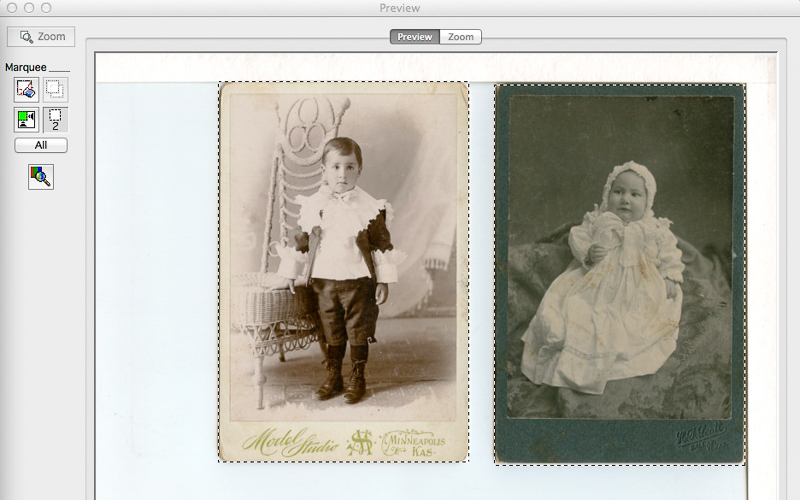
Are you looking for a little help Digitizing Photos and Documents with the GeneaBloggers Genealogy Do-Over?. This week, GeneaBloggers Thomas MacEntee gives tips for eight best practices, including scanner settings, file formats, and duplicate copies for editing.
You might be wondering why 300 or 600 dpi? Why TIFF? and Why create an archival TIFF copy? Good questions!
Why Use a Standard Scanning Resolution?
In researching standard best practices for archiving family history materials, I looked at the common practices of museums, libraries and archives nationwide where staff members and interns routinely digitize thousands and thousands of items. I learned that higher resolutions are used for film and for photo restoration projects, but for most items that will be viewed digitally or printed at the same size as the original, a standard scanning resolution is adequate and recommended.
For institutions where volunteers and interns may be performing much of the digitizing and for family historians interested mostly in sharing and archiving photos and documents, standard scanner settings are efficient and easily understood.
Archives typically recommend scanning documents at 200 to 300 dpi and scanning photographs at 600 dpi. Images scanned at 300 dpi or more should print fine at the original size.
Why TIFF?
You may have heard recommendations to use the archival TIFF format when scanning your heirloom document and photos and been reluctant to devote computer storage to such large digital files. What could be so much better about a TIFF file?
Thomas is right — whenever possible, TIFF is the preferred file format for digitizing keepsake photos and documents. If you’re going to the trouble to scan and save these items, scan only once with the optimal file format and resolution. Tagged Image File Format (TIFF) is a non-lossy archival format. The plain English translation: TIFF files aren’t compressed when saved, so your file retains all of the digital information. In contrast, JPG files are lossy files; the file is compressed each time a file is saved and some information is lost.
Why Create a JPG Copy of a Digital Image?
Yes, TIFF files are large, but TIFF is the best choice for archiving. Create a duplicate file in JPG format to use for editing, email, and photo projects. Archive the TIFF version as Digital Insurance to help you recreate a lost or damaged original in case of disaster. If your original is a JPG format image, create a copy in TIFF or JPG and designate it as your Digital Master.
More Questions?
Learn more best practices for working with digital images in my paperback or ebook edition of How to Archive Family Keepsakes including
- easy scanning workflows
- file naming
- folder organization
- recommended digitizing resolutions
- backup strategies
- scanner suggestions


I’ve been scanning all of my old photos at 600DPI for two reasons; first I want the option to enlarge my original images no matter the resolution. Second, we dont know how much more software will be able to enhance and improve an image in the future. Products such as photoshop have already provided us the opportunity to repair images that we at one time thought were lost forever. Scanning at 600DPI and storing photos in a raw format (TIFF) may one day offer us an even broader spectrum to work with. Great article Denise, keep up the good work.
Thank you for the kind words, Manny. You make a great point — looking ahead! Digital tools are only getting better, but the more digital information we preserve in the way of high-quality scans, I believe we will be in a better position to take advantage of those tools. Your comment is a good reminder!
Thanks for the shout-out Jana. I always find something I missed on your weekly roundup, and appreciate being included.
~ Denise
Thanks for your comments, BobH. You are absolutely correct that the original material needs to be considered first when determining practices for a scanning project. And, family photos are often lower quality and smaller in size than many museum prints. The purpose of the standard 600dpi recommendation is to give family historians a "sweet spot" that will be easy to remember and suitable for most scanning situations. The higher dpi gives flexibility for enlarging future images, and hopefully capture faded handwriting or other nuances on the reverse as well as the front of the image.
This helpful guide from the Library of Congress website offers more ideas and also recommends the 300-600 dpi scanning resolution — http://blogs.loc.gov/digitalpreservation/2013/01/scanning-diy-or-outsource//
~Denise Levenick
Denise,
I want to let you know that your blog post is listed in today's Fab Finds post at http://janasgenealogyandfamilyhistory.blogspot.com/2015/02/follow-friday-fab-finds-for-february-20.html
Have a great weekend!
When comparing the scanner settings used by a museum or library and the domestic situation, I think the scanned material needs to be taken into account. Museums will in the majority of cases be scanning professionally taken large format photographs. The photographs are likely to be reproduced to the same scale as the original. In a domestic situation, a good proportion of the photographs are likely to have been taken by amateurs using simple equipment, the photographs will be small scale (what used to be called "contact prints" ie the same size as the negative film.
There are two contradictory factors to take into account in this situation, (1) the poor quality of the photograph; it is likely to be grainy, have poor contrast and may be out of focus, these points possibly mean that scanning at even 600 dpi is above the quality of the original; (2) it is quite probable that the person scanning the photograph wants to print the copy at a scale considerably above the original when, other things being equal, 600 dpi may not be sufficient for reproduction at the scale required.
I think it incorrect to recommend a single rule of "use 600 dpi"; I think advice should be given to consider the quality and size of the original and to consider the final use to which that the scan is being put.