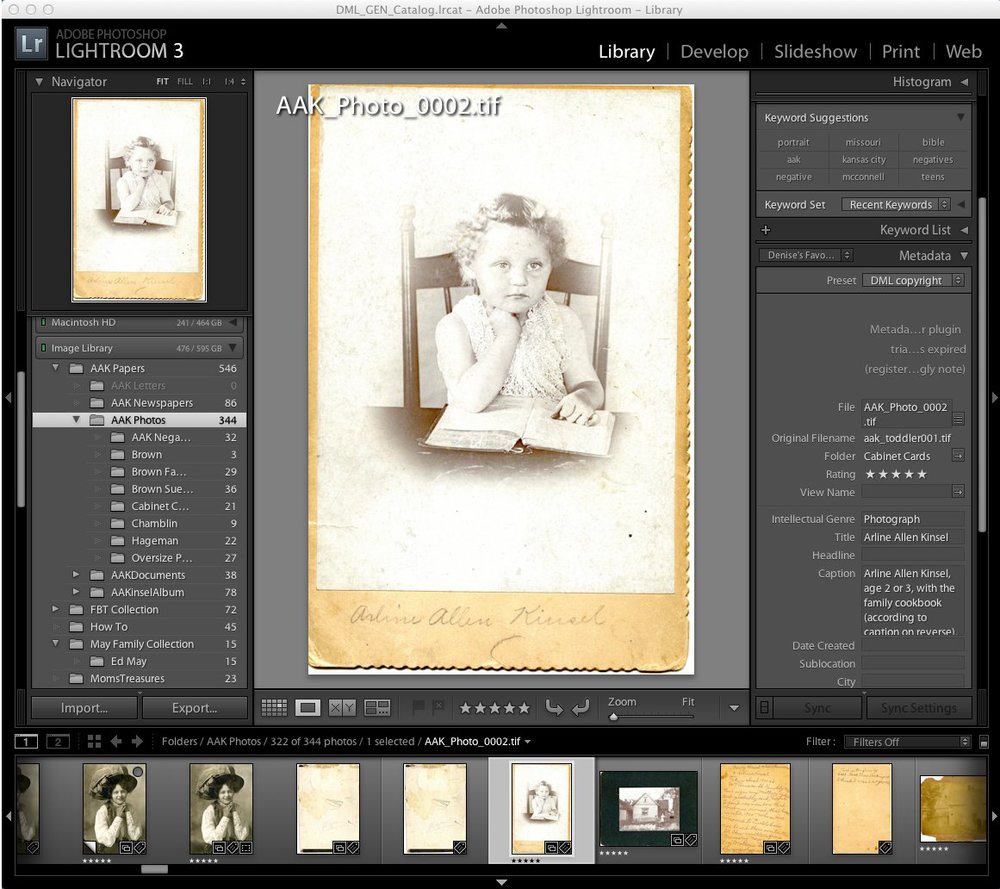
The Library Module in Adobe Lightroom3 shows the keyword and
metadata tagging windows in the right-hand
Using a scanning workflow speeds up my digitizing project and helps maintain consistency. This post continues with the genealogy scanning workflow I use for family history photographs, documents, and letters. Last week in Tech Tuesday: Streamlined Scanning with a Genealogy Workflow, Part 1, I described my typical scanner settings and scanning process.
This week, we tackle Part 2, and move the digital image files to a photo organizer/editor such as Lightroom, Photoshop Elements, or iPhoto for tagging, cropping, and editing.
After scanning my photographs and storing the images on my external MyBook hard drive (Western Digital), I turn to Part 2 of my Photo Workflow.
Importing Images to a Photo Organizer/Editor:
Note: TIFF Images are stored on an external hard drive.
1. Connect hard drive to desktop computer.
2. Open Adobe Lightroom, Import photos, with settings to retain file names.
3. After import, tag photos with useful keywords, location, names of subjects, place, date.
4. Rename files with descriptive file name prior to original scan filename. For example: aak-001 becomes
kinsel-arline_1912_ portait_aak-002
I use a hyphen to separate names and placenames and an underscore to separate categories, thus name_year_description/place_original file nameNote: I decided to continue using a file identification number for correspondence rather than try to develop a suitable meaningful filename. This makes the post-scanning work much faster.
4. Convert files as JPG and store in same folder as originals. File extension will differentiate TIFF and JPG.
5. Back up file on second MyBook hard drive.
6. After tagging, converting, and backing up, TIFF files are never touched! All edits are made to jpg files. In Adobe Lightroom, all edits are “nondestructive” meaning you can return to the original without loss of data. Files may be resized, emailed, cropped, etc. all without damage to the original image file.
Other photo editing software can do a similar job with tagging, renaming, and converting from TIFF to jpg. Adobe Photoshop Elements is a great program and easy to learn and use; Apple iPhoto or Adobe Photoshop Elements for Mac does the job for Mac users. But, to the best of my knowledge, Adobe Lightroom is the only software that offers “nondestructive” editing. If you use a program that records changes on the original file, it is wise to always work from a copy, and save an archived original.
With my originals safely archived on MyBook (#1), and backed up to MyBook (#2), I am comfortable editing and working with the jpg images on my hard drive.
Learn more about digitizing your family keepsakes and your genealogy papers in my new book, How to Archive Family Keepsakes. Special Offers now available from Family Tree Books, regularly priced $24.99, now $15.49, and save an additional 10%. Click here for info.
This article is updated from Tech Tuesday Setting up a Genealogy Photo Workflow, Part 2 published 28 July 2009.
You might also like — Using Adobe Lightroom to Manage Genealogy Images





Thanks Brian, for sharing this tip. That's an easy formula to use. I've hesitated to give too much math, because it gets confusing, but this is a simple solution!
Great article. Here's my two cents:
I work in an archive and scan quite a lot (including my own). For resolution of documents we also use 300 dpi, but for photos we use the formula of 5000 divided by the longest dimension in inches, with a minimum of 600 dpi.
Workflow/checklists/routines – I use Checkvist at https://checkvist.com/ for such as backups, genealogical sources to check, responding to family history enquiries; infact, anything that needs a tick-off checklist. You can use it online or as a printout (woodman, spare that tree!) and, for the home user, its free. Yes, that's FREE!
If you're into mindmaps, it can also import and export into various formats.
Usual disclaimers – hope this helps.
Tom